
A&A-Scheduler
How it works
Management screen
Task Scheduler
Working with a microcontroller
Permission
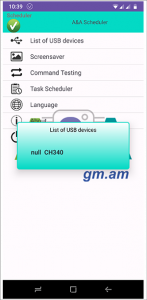
Item “List of USB Devices”
Before you start developing your project, make sure that the application supports the controller you have chosen to work with the USB UART microcontroller. On many already assembled platforms such as arduino UNO, arduino NANO, etc. USB UART controller integrated. You need a platform with an integrated USB UART controller or a separate USB UART controller connected via USB to your Android device. The application can be either already running, or it can be launched after connecting the USB UART. Open the control screen, click on the item “List of USB Devices”.
If a new entry appears in the opened window, then your device is supported by the application.
How to coordinate the operation of the microcontroller with the application, see here.
Item “Screensaver”
This is an optional feature. When you click on this item, a screen is called up in which the picture changes at a certain interval. When you install the application, the “Assistant” folder is created in the “Download” folder of your device, and in it the “Picture” folder. If you copy your pictures with the “.jpg” extension to Download\Assistant\Picture\, the Screensaver screen will scroll through your pictures. The splash screen works on top of all applications. During its operation, the device does not go into “sleep”. This screen can be scheduled. If you scheduled a call to him and at that moment the device is in sleep mode, then it wakes up from this mode and the screen saver starts.

Item “Command Testing”
If you have debugged your circuit and the application recognizes your connection, then before scheduling a task, you can send a command to the microcontroller by selecting it in the window that opens.
Item “Task Scheduler”
Look here.
Item “Turn off application”
This item completely disables the application. The application’s note message will be deleted, stopping the execution of all scheduled tasks.